Showing posts with label craft. Show all posts

Wednesday, 29 June 2016

Go Jetters Magazine from Cbeebies ‪#‎GoJettersGo‬

child Reading Go Jetters magazine

Elizabeth is coming to the end of her first year in school and she has developed a real love of reading during her time in reception. As well as enjoying the vast and varied library of children's books we have collected over the last few years, she loves being able to choose a magazine as a treat when we go to the supermarket, and I love that she no longer makes her choice purely based on the plastic toy that is taped to the front!

As most parents of young children will know, there are multiple shelves full of colourful magazines to catch the eye of little ones in most supermarkets and newsagents, but not all of them are offering the same value. Some I find have pages upon pages filled with adverts for the latest toys or TV shows and not a lot to hold a child's attention. An exception to this is the growing range of kid's magazines from Cbeebies magazines, including Swashbuckle, The Furchester Hotel and more...

Today another fabulous Cbeebies show has it's own magazine out in the shops an I can already tell it's going to be a firm favourite!

Go Jetters magazine - issue one with free toy

The new Go Jetters magazine follows on from the popular Cbeebies show that takes viewers on a fun but educational adventure around the world. If you've not seen it yet you'll soon have Last night a GJ saved my life stuck in your head on repeat! (Sorry!)  

In the magazine you can meet the Go Jetters gang an find out all about Xuli, the pilot, Kyan, the gymnast, Lars who can fix anything, Foz, the problem solver and of course Ubercorn who guides the Go Jetters and shares lots of interesting facts! There is even a Blippar app that parents can download to their phone so little ones can get even more  fun out of the magazine!

meet the Go Jetters


The magazine, like the show, is aimed at both boys and girls aged three to five, and is an ideal way for little ones to learn about geography and famous landmarks as it introduces children to places they may not have experienced before.


colouring in with the Go Jetters

Go Jetters Fun

girl reading a magazine

spot the changes with Go Jetters


Issue one is out today (Wednesay 28th June) priced at just £2.99 and is packed full of fun, including an exciting free Vroomster launcher toy plus Xuli figurine, a funky Ubercorn workbook, a colourful Go Jetters poster and sticker reward chart and much more!


playing with Xuli  - GO JETTERS


Editors Quote

With Go Jetters magazine readers can travel anywhere in the world and be part of the amazing Go
Jetter Academy. The exciting editorial encourages children to problem solve and to find out about
famous landmarks all over the world.
Whether it’s Niagra Falls, the Sahara Desert or the Eiffel Tower, Go Jetters engages children’s
imaginations so they can learn about geography in a way that is gripping and meaningful to them.
The editorial sparks children’s curiosity and encourages them to ask questions and have conversations about places. It provides opportunities for them to discover more about where they live as well as places far away.
There’s plenty of humour with Grandmaster Glitch, plus incredible facts to learn from disco-dancing Ubercorn along with thrilling Go Jetter adventures for our readers to enjoy. The gifts include the most amazing vehicles, awesome gadgets as well as fun toy figurines to play with!
Go Jetters magazine really is a global adventure for little learners!


Make your own Eiffel Tower simple craft

  Elizabeth enjoyed colouring, stickering, spotting the difference, reading, problem solving and of course leaning lots of interesting facts about landmarks around the world, but her favourite part was definitely making her very own Eiffel Tower to fly her Vroomster around! It was a simple but engaging craft activity that kept her focus for at least fifteen minutes, she then used the free Vroomster and Xuli toys along with her paper cut outs to become involved in imaginative play, chatting to herself all about Niagara Falls and the Eiffel Tower! I'd love to know all about the adventures she was having!

imaginative play with Go Jetters


As if that isn't enough value packed in to one magazine, there is a final treat in store! Inside the magazine is an exclusive voucher for one free child admission to Alton Towers, Sealife, Madame Tussauds, Coca Cola London eye and other Merlin attractions. See voucher on page 16 for more details and full terms and conditions!

Kids go free at Alton Towers, Cbeebies Land, Sealife and other Merlin attractions


We were sent the magazine for the purposes of this review.

Sunday, 4 October 2015

Talking about Money with kids...

money bank

As someone who believes that managing your budget and finances is a skill that should be learnt from a young age, I wasn't surprised to read that research conducted by Think Money showed that three quarters of parents would like financial education to start in primary school. I agree that as children learn the basics of Maths they should also be taught about money and how to manage a budget.

I was lucky that my mum taught me important financial skills from a young age and this introduction to budgeting has meant that from the age of 17 when I moved out on my own and had bills to manage I have done so successfully and always managed to live comfortably withing my means. It worried me when I saw friends at University spending their student loans within weeks and then having to rely on credit cards and the kindness of friends to survive the rest of term. These were intelligent young people who just hadn't been taught how to manage their money.

I want to ensure that both of my children grow up with a firm grasp of how to mange their money and I strongly believe that the way to do that is to encourage this from an early age.


My top three tips financial tips for children are:


Learn to manage a budget - This can start with simple things like having pocket money that they have to manage themselves and use to buy their own treats, rather than being bought things on days out.

Encourage Saving - I think it's really important to teach children to understand that if they want something, like a particular toy or day out, they may have to save up for it. Children respond well to visual aids so a good way of doing this is to get them to draw a picture of what they want to save up for and stick this on to a clear glass jar so they can see their coins build up towards their target.

The Value of Money - One of the most important things for children to learn about money is that it has a value. It doesn't just 'grow on trees' but is earned through hard work. I'm not advocating child labour but a few simple age appropriate chores such as tidying their bedroom or helping set the table for dinner in exchange for pocket money can help to teach children that money has value.

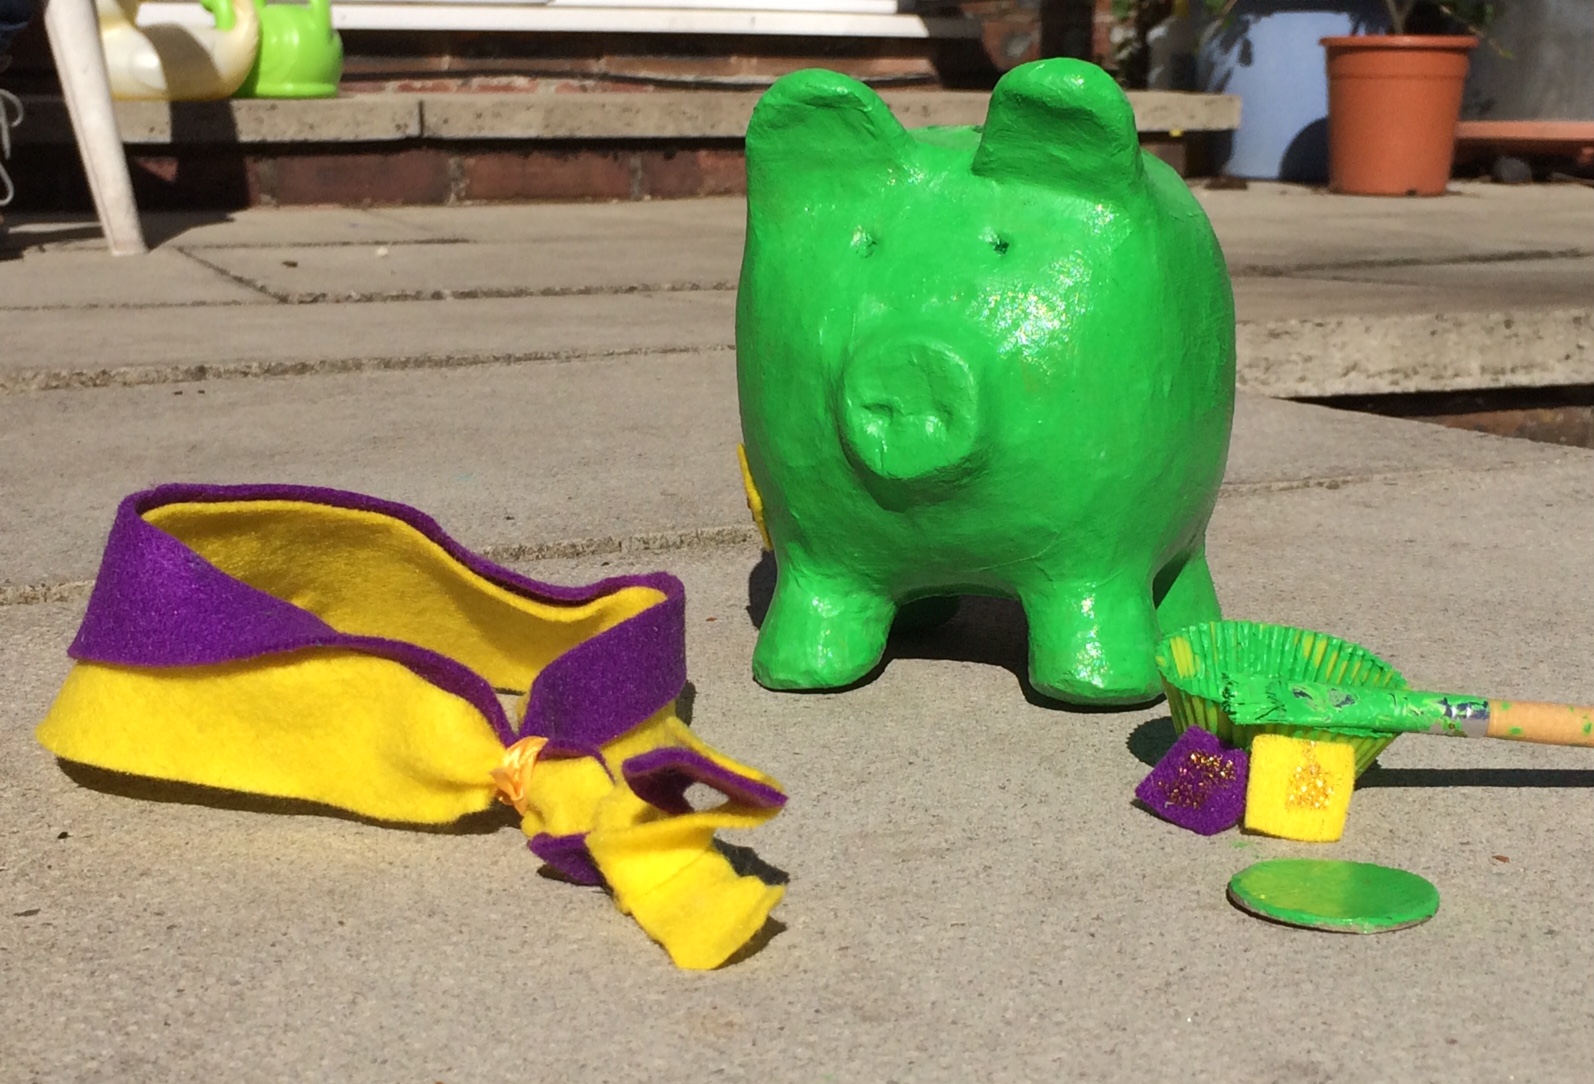
To encourage parents to talk about financial skills with their children the folks at Think Money sent us a plain brown piggy bank and a Hobbycraft voucher to get creative with.

I took the opportunity to talk to my children, Ben who has just turned eight and Elizabeth who is four about what they like to spent their money on. Elizabeth talked about sweets and toys as well as books from our local charity shop which are quite short term, whereas Ben was looking further in the future towards spends for holidays and Cub camps. We talked about saving up and he showed an understanding that if he kept hold of the few coins he got on a weekly basis he would have a much larger sum in the future.

Ben has recently swam up from Beavers to Cubs and this weekend went on his first cub camp so it seemed apt that he decided to use this as a theme for the piggy bank.

children crafting


Both children loved choosing their craft supplies in Hobbycraft and Elizabeth helped Ben paint the pig green, decorate it with the Cubs logo in glitter glue, coat it with decoglue to give it a glossy finish, while he very carefully made some challenge badge and a fabulous necker from coloured felt that matches his own!

creating a cub scout themed piggy bank

penny in a piggy bank

Cub scouts piggy Bank


Cub uniform


We're all really proud of the finished Piggy Bank and I hope it will give Ben the perfect reason to save up his pennies toward spends for his next camping trip.

This is an entry into the Think Money Budgeting with Children Competition.

Tuesday, 11 August 2015

FabLab Bathbomb Making Kit - Review and Giveaway

I love a relaxing bath, and adding a beautifully scented bathbomb to the mix adds to the experience! Even the children love a fizzy treat in the bath. They also love to experiment so when we were sent the FabLab Bathbomb Making Kit from Interplay they couldn't wait to create their very own bathbombs!

FabLab Bathbomb Making Kit - Review and Giveaway


The kit mixes science with scented fun and would make a great activity for a sleepover or party! The set is aimed at ages 8 and over but younger children can enjoy it with adult assistance.

Inside the box you get:

• 1 Pot of Sodium Bicarbonate (Blue)
• 1 Pot of Sodium Bicarbonate (Pink)
• 1 Pot of Citric Acid
• 2 Bath Bomb Moulds
• 2 Plastic Spoons
• 1 Measuring Beaker
• 1 Pair of PVC Lab Gloves
• 5 Sheets of Pink Tissue Paper
• 5 Lengths of Red Ribbon
• 12 Page Instruction Booklet
• 1 Pipette
• 5 Gift Tags

A small amount of liquid soap or shower gel is also required and not provided in the kit and you can add a scent with a drop of perfume too.

FabLab Bathbomb Making Kit - What's in the box - instructions


The full colour instructions had both pictures and text and were easy for Ben to follow without much involvement from me. Although the chemicals in the set were not harmful to skin I was pleased that the gloves were provided for Ben to use to prevent any irritation.

We started off by measuring the Sodium Bicarbonate and Citric Acid out and then mixing them together then using the pipette added tiny drops of shower gel before mixing again. Both children really enjoyed this part, they were excited by the change in consistency when the ingredients were mixed together.

making bathbombs with Sodium Bicarbonate and citric acid

Once the mixture was as described in the instructions, Ben started to spoon it in to the plastic mould and pack it down to create the round bath bomb shape.

This is where things started to differ from how they were described, at first our powder seemed to dry and crumble as soon as the mould was opened, next time we tried adding sightly more liquid as listed in the 'tips' section of the instructions but then it started to fizz in the mould. It took a few attempts but eventually we were able to get a couple of round shaped bathbombs that looked great! We left them to dry on the windowsill for a day and they hardened and became much easier to handle and wrap in the pretty pink tissue paper.

The Sodium Bicarbonate comes in two colours, so you can make pink or blue bath bombs or mix them together to create a marbled effect.We did this and they looked really effective.

Making Bathbombs with Fablab from Interpay


Ben who is 8 this month, thoroughly enjoyed the whole experience, he loves discovering how things work and was asking lots of questions about the reaction between the ingredients and why they fizz up in water. He even used the supplied tissue paper and ribbon to wrap a couple up to give as a thank you gift to Nanna for taking him out for the day.

Elizabeth who is much younger did get frustrated when things didn't go to plan the first time and got a little bored with the whole process but she is a lot younger than the suggested age so that isn't surprising. I can see this activity being something she would absolutely love in a few years time.

We contacted Interplay mentioning the fact we'd had issues with our first few attempts and they came back with these helpful tips:

  • Use some oil to lightly grease the inside of the mould before starting to add the mixture in.
  • Leave the filled mould in a warm dry place such as a windowsill for around 30 minutes before attempting to open it.

Although not all the bathbombs we made went entirely right, they all smelt delicious and were fun to try out in the bath! We have a small amount of ingredients left and Ben wants to use them to make a special gift for Gran's birthday.

Although the colours of the packaging seem to market this at girls, I would recommend this set for both boys and girls age 8 and above as a great activity to get them thinking about the way different chemicals react with each other while also having fun! They also make ideal home-made gifts from children for friends and family!

With pretty much everything you need to make 12 bath bombs and clear, easy to follow instructions I believe this set is great value at an RRP of £12.99 and would make a great gift.

Win a FabLab Bathbomb Making Kit from Interplay


If you want to try making your own bathbombs then we have just the giveaway for you! The lovely folks at Interplay have given me a FabLab Bathbomb Making Kit to giveaway to one of my readers!

Just follow the rafflecopter instructions below for your chance to win...

Good Luck!


a Rafflecopter giveaway

Saturday, 1 August 2015

Beados Gem Designer Studio Review

Beados Gem Designer Studio Review - My Mummy's Pennies

My four year old daughter loves pretty jewellery and is keen on threading colourful beads and making things to wear. I've seen a few different jewellery making kits around but they all seem to be aimed at older children, so I was delighted to be sent the Beados Gem Designer Studio to review as it's safe and simple technique means that it is suitable for children as young as four years old. 

Beados gems join together with just a spray of water, meaning that no glue or heat is needed and they are safe and mess free for young children to get creative with!

The Beados Gem Designer Studio provides a special six compartment storage for your gems which also allow creative little ones to select which colour to use, then use the attached Gem pen to place them onto the template which fits perfectly under the gem selector.  The studio also comes with a variety of accessories to enable children to make a ring, necklace and bracelet. 

Elizabeth was very excited by the colourful packaging and wanted to get started as soon as the parcel arrived!

We unpacked he box, which contained:

500 x Beados Gems in 5 colours

1 x Gem Studio (needs some assembly)

1 x Necklace

1 x Necklace Pendant

1 x Ring

6 x Jewellery Attachments
1 x Bracelet
2 x Design Trays
6 x Design Templates
1 water Sprayer
1 x Instruction leaflet


Beados Gem Designer Studio Review - What's in the Box

After much deliberation of the six designs available, Elizabeth chose to make the colourful bracelet which involved creating 5 different coloured beads and bringing them together using one of the supplied accessories. The template fitted easily under the design tray and she selected her first colour in the bead selector and pressed the button on top to get started. This is where it started to get frustrating for her as she found the bead pen difficult to handle and aim and the beads seemed to regularly get stuck in the tube. I had to help her out and we eventually found it easier to just release the right amount of beads onto the tray and she would then move them into place with her fingers. Although the beads were small this was easy for her to do.

Four year old making pretty bracelets with Beados Gem Designer Studio

Once we had all the beads in place Elizabeth used the water spray bottle to gently squirt them with water then add the small circle discs, we had to leave them a while to dry before squirting again and placing the top layer of beads on to the discs.

Spraying Water to set the Beados Gems

Once they were totally  dry (around 90 minutes later ) we threaded them on to the pink plastic bracelet and Elizabeth has her very own colourful piece of jewellery made by her own fair hands. She was delighted with it!

Four year old girl with the Beados Gem Designer Studio Bracelet she made.

Pros


A great mess free activity that children will adore!

Plenty of contents included for multiple uses and a selection of jewellery types to make.


Cons


The 'studio' with the pen seems almost pointless and caused frustration for my daughter, I think she would have preferred just the beads and templates to create with her fingers.

The RRP seems a little expensive for this set.


Overall Thoughts


The Beados Gem Designer Studio retails at £19.99 and is available at Character Online and Amazon. Overall I would say that this is a nice looking set that has plenty of beads and accessories for multiple uses and provides children with a good choice of designs to make. It is mess free and doesn't need glue or anything that would be dangerous for a four year old to use so allows children to create independently and make something pretty all by themselves. Although 'mess free' the beads are small and if not kept securely can get everywhere so be aware if you have younger toddlers or babies. 

I wasn't totally sure that this set was worth it's price however my daughter loves it and can't wait to get started on her next project despite some frustrations with the kit during this one. So for that reason I'd say it would be a good buy for a creative child aged four or above.

Tried and Tested

This item was sent for review purposes, opinions and images are my own. Post contains affiliate link.

Saturday, 4 July 2015

Teaching My Daughter to Sew


Yesterday I taught my four year old daughter to sew... and she loved it!

Just under a year ago I was able to reduce my hours in work to spend one day at home with my four year old daughter, at first this would be be a planned day of adventure making an effort to pack as much into our day together as possible. As the weeks went by we began to take these days for granted and got into the a bit of a routine; after walking her big brother to school we'd spend an hour or so at the park, pop to the post office or local shop to run some errands and make it home just in time to get started on lunch. The afternoons would usually involve baking of some kind, reading stories, a craft activity or board game and maybe a movie while I got some bits and bobs done around the house.

Although a little repetitive I look forward to these Fridays together and so so does Elizabeth, it's her 'Mummy Time', something that as a younger sibling who has been in full time nursery since she turned one, she doesn't get a lot of on her own.

 It struck today that these Mummy and Daughter days that we have both grown accustomed to, are coming to an end sooner than I had realised. I had been aware that Elizabeth starts school in September and I will be returning to full time work a week later, however what had dawned on me yesterday was that my first born, Ben, will be breaking up fir the summer in just two weeks!

Of course I'm really looking forward to being able to spend my day off with both my children and we have all sorts of days out and adventures planned, but I will miss our girly days together.

That's why in the afternoon I really wanted to do something different.

I've always loved sewing, my Nanna taught me when I wasn't much older than Elizabeth is now and I dabbled in making some dresses as a teen, but it's not been until recent months that I've really got back into doing it again and I'd noticed that Elizabeth had stated to take an interest.

I was sewing a broach back on to a corsage i'd made when she asked if she could have a try. Showed her how to safely hold the needle and told her what to do and she made a few stitches.So rather than putting my sewing bits away after this I routed through my craft stash and found some felt scraps.


I cut a really simple purse shape out of a piece of pin felt and threaded a needle. Folding the felt down and holding the edges together I made a few blanket stitches while Elizabeth watched, she was eager to take over and copied me easily sewing along the edge until she got close to the end where I knotted it off for her. I then started her off on the other side where again she continued until she was close to the end and I tied it off, I popped a few invisible stitches in the top and then popped on a very sparkly button that Elizabeth chosen from my button box.


We then turned the whole thing inside out and voila...  A very cute little coin purse that my four year old is extremely proud of!


She really enjoyed it and has already asked what we can sew together next!


I'm linking up with #Trash2treasure the fabulous new linky from Coombemill


Trash 2 Treasure


Monday, 29 June 2015

Wood Worx Jewellery Box Kit Review and Giveaway

Wood worx craft kit - jewellery box


Earlier this month we were sent one of the brand new Wood Worx sets from Interplay to review. The
Jewellery Box kit is aimed at children between the ages of 5 and 12 and is a great way for them to be creative while also using valuable skills such as measuring, sorting sizes and shapes and hand eye co-ordination.  For children up to the age of 7 this is an activity they would do with adult assistance, where as older children may want to take on the project independently. Elizabeth is almost 5 and was very excited about working on this together.

In the box you have everything you need:

  • 29 pre-cut smooth edged wooden pieces
  • 5 colored paint pots
  • 1 tube of glue
  • 1 tube of glitter glue
  • 15 rhinestones
  • 1 double ended paintbrush
  • 1 sticker sheet
  • Stencil
  • Step by Step instructions with pictures


wood worx  - make your on jewellery box

From the colour of the packaging and the heart pieces included in the set it is clear that the kit is aimed at girls, which I think is a real positive for a hands on wood work based kit, however there is no reason why a boy couldn't use the set if he wanted. There are also a variety of other sets available in the Wood Worx range too.

We got all the pieces out of the box and as suggested on the instructions, we began to measure up the wooden sections using the handy ruler printed at the bottom of the instruction sheet, creating piles for each drawer. Elizabeth proudly did the measuring all by herself and really enjoyed it.

Next, it was time to start gluing the sections together. I was impressed with how clear the instructions were to follow even for a child, providing step by step images and clearly worded hints and tips, although one thing they didn't dictate was how much glue to use. I fear my daughter may have been a little generous when squeezing this out as the tube ran out before we had completed the final drawer. We were able to use a tube of pva glue we had in the craft box but I would recommend dotting the glue onto the wooden pieces rather that squeezing out continuous lines like we did.

Once all the pieces were glued together we left them outside for a while to dry out and had some lunch. When we returned around an hour later both the chest and the drawers were solid and ready to paint. This part I left to Elizabeth as she had a clear idea of what colours she wanted where!

The paint provided was in a selection of colours that complemented each other well and the size of the pots were plenty big enough as long as you didn't want to paint the whole thing in one solid colour!

making and painting a jewellery box

Once the paint was dry we glued on the heart shaped handles and spherical feet. Now at this point I thought the Jewellery box looked gorgeous and would happily had it on my bedside table. However little girls (well my little girl, at least!) like sparkle and glitter and lots of stickers! Luckily the Wood Worx kit provided all of this, so she got to work decorating the box, using stickers to display her name on the back, stencils to create a pattern on the top, and rhinestones and glitter glue to add that extra sparkle!

the finished jewellery box - wood worx

The finished article not only looks great but is a really sweet functioning jewellery box for her to store her pretty beads and bracelets in. The bottom drawer is a little stiff but other than that the drawers slide out easily and the construction as a whole is really sturdy. I am really impressed with what my daughter ad I were able to create together in a day and it has given us both a lovely sense of accomplishment! 

All in all, the activity took us about four hours but that included breaks for the glue and the paint to dry. It was a lovely way to spend our day and I think the kit is great value at an RRP of just £9.99 providing everything you need (as long as you're not too eager with the glue!) The Wood Worx Jewellery Box sets can be purchased directly from Interplay or from Amazon


#Win a wood worx Jewellery box kit

I also have a Wood Worx Jewellery Box kit to give away to one of my lovely readers! Just Follow the instructions in the rafflecopter widget below to enter: 

a Rafflecopter giveaway


If you are feeling lucky why not pop over to Interplay's Twitter page to enter to win the Wood Worx kit of your choice or visit The Brick Castle who are giving away a T-Rex kit...


Good Luck!


Tried and Tested

We were sent this product for the purpose of review, all thoughts and opinions are our own, post contains an affiliate link.

Wednesday, 13 May 2015

CBeebies Swashbuckle Magazine is out today!

Swashbuckle magazine, issue 1 with free pirate hat


The brand new CBeebies Swashbuckle Magazine is out in shops today priced at just £2.75 and we were lucky enough to be sent an early copy to take a look at! My four year old daughter Elizabeth is pirate crazy and Swashbuckle is her favourite CBeebies show!

The first issue of the Swashbuckle magazine comes packed full of fun activities and includes a free Swashbuckle play set, featuring a foam pirate hat, pretty jewels, a special pirate spinner and your very own treasure chest!

Swashbuckle magazine, issue 1 with free gift


The latest magazine from the CBeebies folks is aimed at children between the ages of four and six and my four year old has really enjoyed it. I've often found that the magazines aimed at children of this age tend to be very gender specific, although Elizabeth loves dancing and her favourite colour is pink she would rather be wearing a pirate hat than a tiara any day! I love that Swashbuckles magazine appeals to both my son and daughter in equal measure.


Although the free gifts are ideal for role play and have a lot of play value, the magazine has lots more to offer, there are stories, puzzles and crafts that children will learn from while also having fun with their Swashbuckle friends Gem, Cook, Line and Sinker!

Swashbuckle magazine, cook's corner


Elizabeths favourite sections were Cooks Corner with the smoothie recipes she'd decided we're making at the weekend and the Pirate School cartoon, that she got her big brother Ben to help her read! She also enjoyed coloring the pirate ship and like most four year olds she was delighted with the stickers that came inside the magazine.

Swashbuckle magazine, colouring

This magazine is jam packed full of value and is right on target to hold a four year old's attention and encourage them to learn with out them noticing it. This is certainly going to be a regular in our house.

You can read an interview with Steph Cooper, editor of the Swashbuckle magazine, over on the UKMums.tv website and don't forget to follow Swashbuckle magazine on twitter and like them on facebook!

Wednesday, 22 April 2015

Earth Day 2015 - Eco Bead Craft Kit Review and Giveaway


Today is International Earth Day 2015 and to mark the occasion we have been sent the Eco Bead Craft Kit from Interplay to create our own jewellery made from recycled scraps of paper.

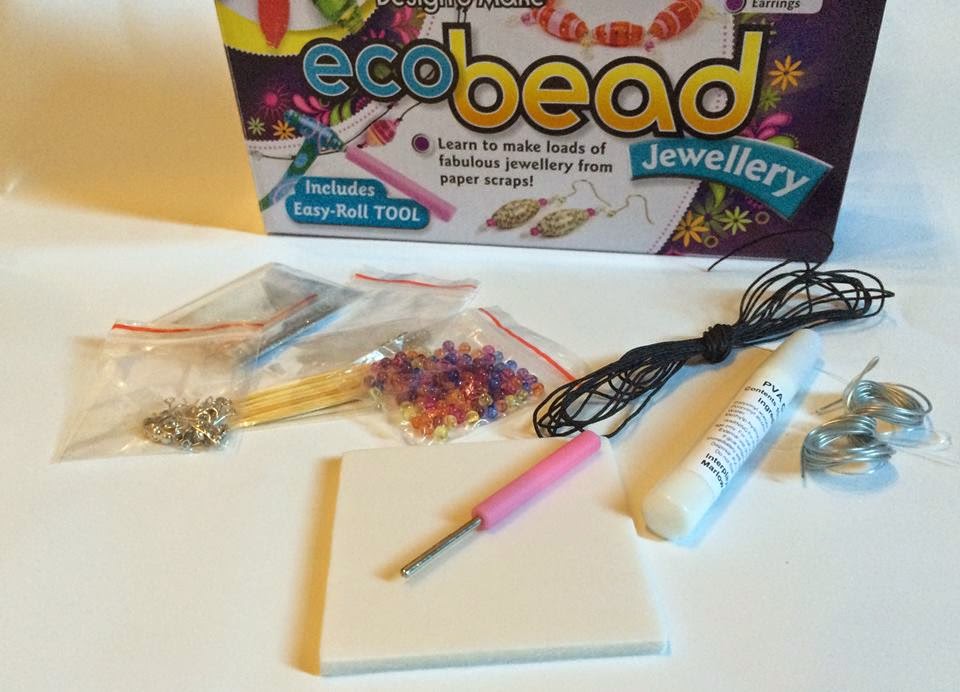
 The Eco Bead kit from interplay is aimed at children aged 8 years and above and includes the tools and accessories needed to make beautiful beaded jewellery. You just add the paper!


My son (who will be 8 in the summer) and I got out the kit to create some beads together.
I love up-cycling and reusing things so the idea of recycling paper to create some funky jewellery really appealed to me, Ben loves anything crafty and decided he wanted to make a bracelet for his little sister.

The My Style Craft kit includes 3 different types of template to cut out the correct shapes of your paper ready to make them into beads. We decided to use some old newspaper that was waiting to be recycled, some wrapping paper and some scraps of coloured paper from our craft box. One great thing about the shape of the templates is that they are long and thin so you can genuinely use scraps of discarded paper or even ripped newspaper.


Once we had cut the paper it was time to use the curling tool, despite this being quite small it was simple to use and really effective, both Ben and I easily got the hang of it and I actually found it quite cathartic! As you roll the paper around you gently dab the PVA glue on to it and then glaze with some more glue afterwards. To allow the beads to dry the kit includes a foam mat and cocktail sticks to stand them on. (We did find that you got rather sticky and the glue got everywhere so I would suggest covering the table with newspaper first.)


Once the beads are dry (we left ours overnight) you can get creative with the provided accessories to turn your recycled paper beads in to beautiful bracelets, earrings and more! One thing to note is we found the thicker string quite difficult to thread through the small decorative seed beads but it was fine with the paper beads that we made.

We created a pair of newspaper print bead earrings and a bracelet made from recycled wrapping paper.


I think the newspaper print earrings look great and will wear them proudly! I also love the idea of trying this with old books that have been damaged, I think they would look really effective and go fantastically with the Romeo and Juliet real page fragment pendant my husband bought me for our anniversary.

Another fabulous idea for this kit is to up-cycle old pieces of your children's artwork, I love how Anna from In the Play Room created beads with her children's bubble paintings.

If you really haven't got any paper to recycle you can print off colouful templates from the Interplay website ready to create beads with.

Ben and I really enjoyed using this kit together and he is really proud of what we created.

The Eco Bead craft kit is available from Amazon and John Lewis and has an RRP of £7.99 which I believe is really great value as you get plenty of accessories included and when these are used up you still have the tool that you could make plenty more beads with and use ribbon or wool to display them. I can see this getting a bit addictive!


Casa Costello


To celebrate Earth Day we have an Eco Beads Craft Kit from Interplay to give away to one of My Mummy's Pennies' readers. Simple complete the Rafflecopter form below for your chance to win...

Good Luck!

a Rafflecopter giveaway


Terms and conditions

UK entrants over the age of 18 only.

Entrants will be submitted to the random draw. All entrants must complete the mandatory entry on the rafflecopter form.

Incomplete or Duplicate entries will be deleted.

All times are in GMT.

The giveaway ends at midnight on 19th May 2015

Blog Owner not responsible for non-delivery of prize. Prize provided direct from promoter. 

Entrants must leave a means of contact: either twitter handle or email address.

Prizes must be claimed within 2 days, otherwise another winner will be selected to replace the non-claimant.

The prize is the item featured in the post, and there is no cash alternative.

Please allow 14 days for delivery.

Winner must supply a postal and email address which will be used only to send out the prize.
Multiple entries will be disqualified.

Post contains an affiliate link.